
KSP for Dummies - Lesson 1: The Interface
.thumb.jpg.b838522f9d3d2feb031634f2491f9979.jpg)
Entry posted by Bogart
3,143 views
I wasn't here at all last week during APs, so I have no idea how well prepared everyone is.
The next few blog posts I'm going to make will be some simple lessons on how to play Kerbal Space Program, since I have had... some experience.
That's a clip from my steam profile, and although I haven't really played in about a year or so (Ignore the fact that it says "Last Played: Today", I was getting some pictures to use in this post), I still remember how everything works. Mostly.
So let's start with just the very basics: the interface. When you first start, it can be pretty overwhelming, since it just throws you into the space center without much direction. The picture below shows the buildings you might have to use during our class competition.
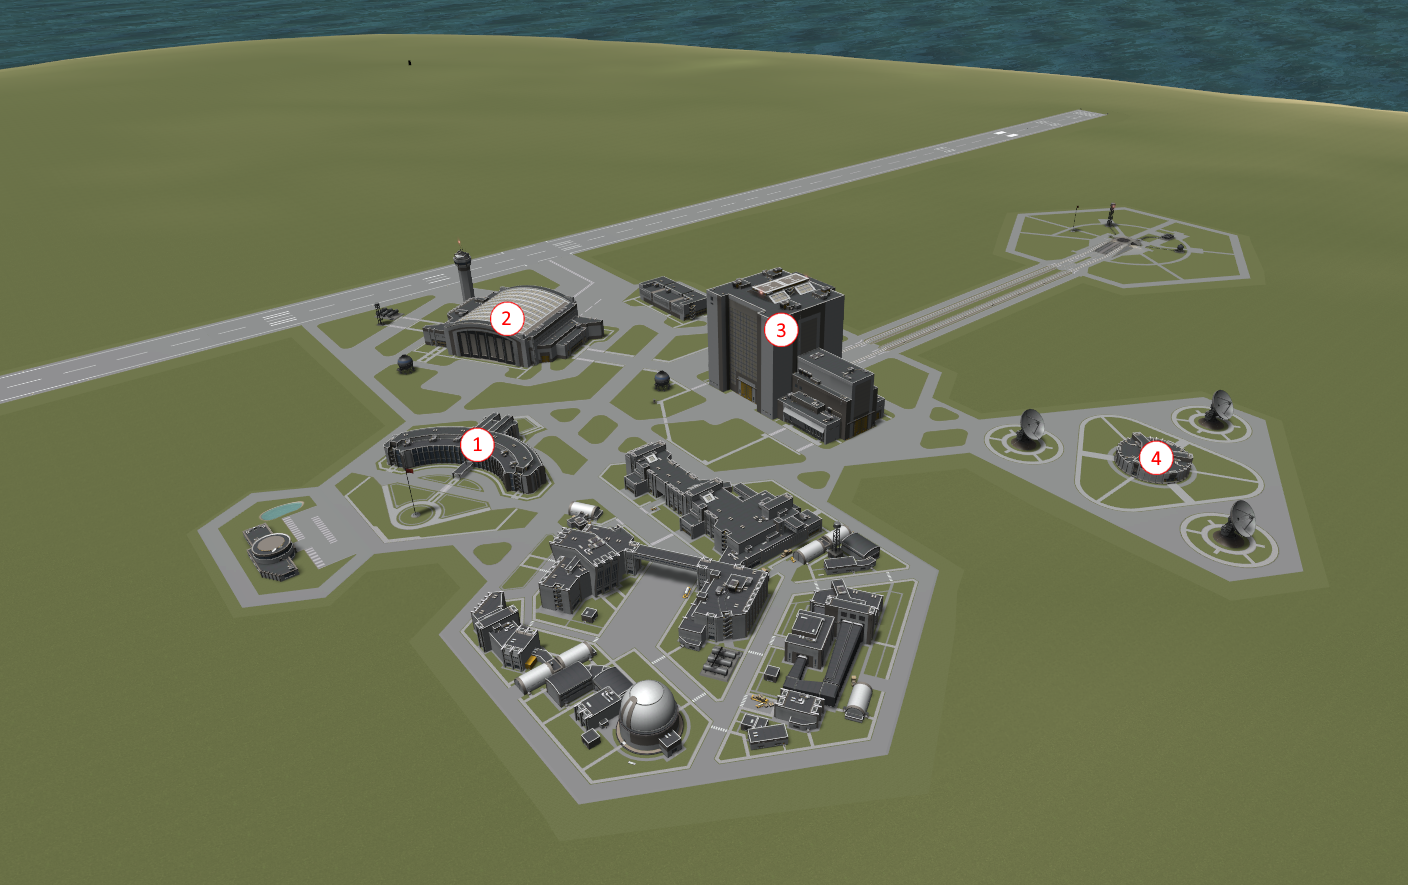
The labeled buildings are the buildings we're going to be using in class.
Building 1 is the Astronaut Complex, where you'll hire new astronauts.
Building 2 is the Spaceplane Hangar, where you'll build planes, and maybe even spaceplanes.
Building 3 is the Vehicle Assembly Building, where you'll build your rockets.
Building 4 is the Tracking Station, where you can track and take control of active missions.
The other buildings that you won't be using are for the other gamemodes in Kerbal Space Program, where you'll need to manage your funds and research parts. For now, let's just get into each building.
The Astronaut Complex is fairly simple, and I'm sure you can figure out if you ever need it.
The Spaceplane Hangar is identical to the Vehicle Assembly Building (which I'm going to go into detail next), except sideways, because it's meant to build spaceplanes instead of rockets.
The Vehicle Assembly Building can also be overwhelming at first, but the more you get into it, the easier it is. The next picture highlights the interface.
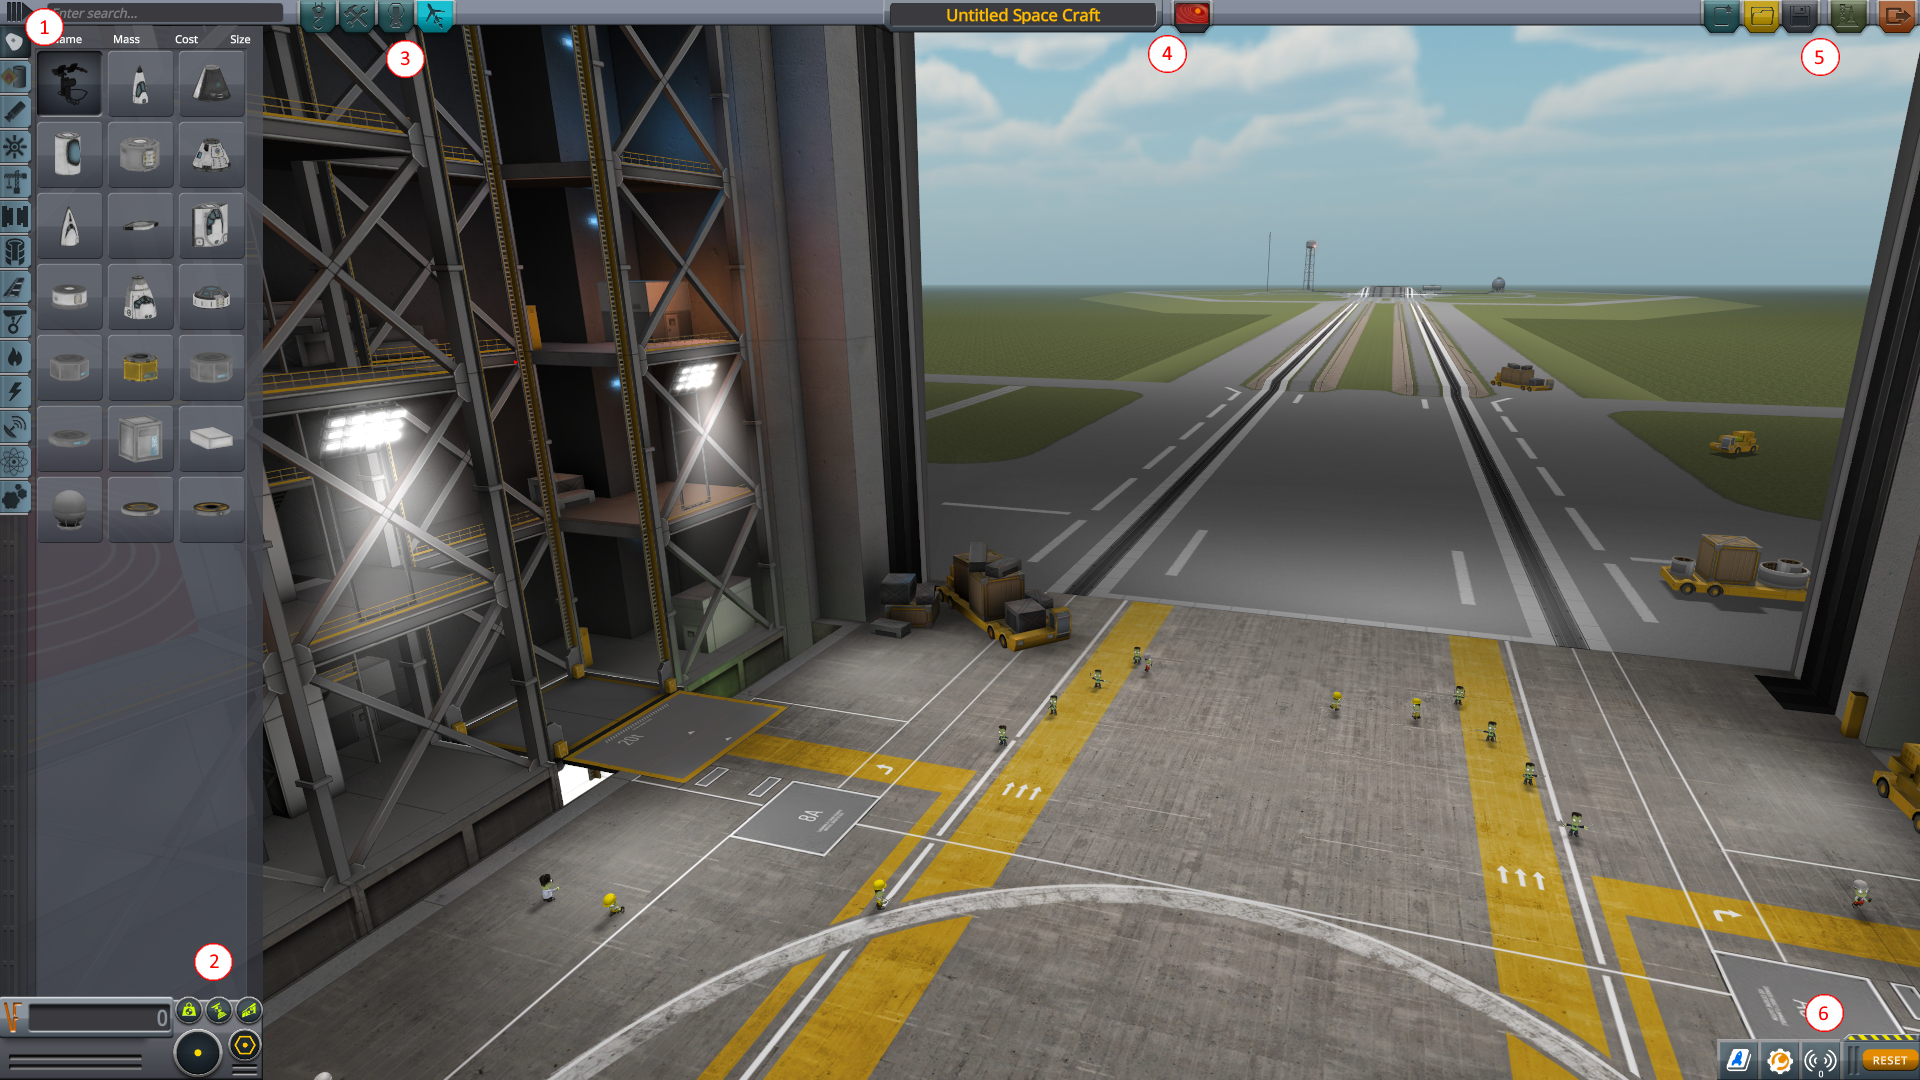
1: There are a large amount of icons going down along the left side of the screen, each of which open a different category of parts that are used to build your rocket. There is even a search bar on the top if you can't remember what category the part you're looking for is in.
2: On the bottom left of your screen, it shows how much money your current design will cost to build. This doesn't take into account any special reduced costs that our group might have, so it's just an estimate. There are also 3 small icons to the right of the money display. Clicking each of them will toggle a marker on your rocket to help you design better, such as showing the center of mass and center of thrust. The 2 icons below that help build your rocket. The larger icon will toggle symmetry, and when in the VAB (Vehicle Assembly Building), equally space 8 parts around your rocket. When in the Spaceplane hangar, this will mirror it along a plane rather than revolve it around an axis. The smaller icon will toggle snapping, which locks your parts to a grid and help evenly space things out.
3: On the top left of your screen, there are 4 icons. 3 are grayed out until you start building your rocket. The first tab is the "Build" tab, which is automatically selected, and shows the parts list on the left side of the screen. The second tab is the "Actions" tab, where you can bind certain actions, such as extending/retracting solar panels to a key on the keyboard. The third tab is the "Crew" tab, where you can select your crew that is going to use the rocker. The fourth and last tab is the "Switch Editor" tab, which will move you from the VAB to the Spaceplane Hangar, and vice versa.
4: On the very top of the screen is a text box where you can name your rocket, and select a mission flag.
5: On the top right of your screen, there are 5 buttons. The first button scraps your current rocket, and will make you start from scratch. The second button will load a saved rocket. The third button will save the rocket you are currently working on. The fourth button will launch a mission with the rocket you are currently working on. The fifth and last button will make you exit the VAB.
6: On the bottom right of your screen, there are 3 tabs and a reset button. Honestly, I have no idea what the reset button is for. The first tab will open the KSPedia, an in-game manual. The second tab will open the Engineer's Report, which is a small window that gives some more details about your rocket, such as weight, height, and number of parts. The third tab will open the messages window, which you don't need to worry about.
The Tracking Station might look intimidating, but, like many other things in KSP, is actually fairly simple.
![]()
It starts by opening to the normal map you'll use when flying your spacecraft, and navigates the same. You can double-click on a planet, moon, or any object (including your spacecraft) to center your camera on it.
1: On the bottom left of your screen, there are 3 buttons. When you have one of your spacecrafts selected, these will become available. The first button is to recover the spacecraft, which can only be used when it is not moving, and landed anywhere on Kerbin. The second button is to destroy the spacecraft and any crew that's on it. You cannot destroy a spacecraft that is recoverable. The third button is to take control of the spacecraft, which you'll need to use if you ever need to go back to the space center temporarily in the middle of a mission.
2: Along the left side of your screen will be all of your current spacecraft. The top left of your screen shows the in-game date and time, and the current level of time-acceleration. Along the top of the screen are a variety of filters to enable and disable to help sort through all of your active spacecraft.
3: On the top right of your screen is the exit button, as usual.
This is the basic interface of KSP that you'll need to use during our class competition. In my next blog post, I'm going to go more in-depth on what to think about when designing a rocket.
2 Comments
Recommended Comments