Flipping Sites
Upstate NY Flipped Forum (Facebook): https://www.facebook.com/groups/667338956711381/
Flipped Learning Network: http://flippedclassroom.org
Tips for High Quality Screencasts: http://bit.ly/1ReECBN
Screencasting Software
Screencast-O-Matic (PC & Mac): http://screencast-o-matic.com
Camtasia (PC & Mac): http://techsmith.com
Academic Superstore: http://www.academicsuperstore.com
Adobe Presenter (PC & Mac): http://www.adobe.com/products/presenter.html
ScreenFlow 5 (Mac): http://www.telestream.net/screenflow/overview.htm
Adobe Premiere Pro (PC & Mac): http://www.adobe.com/products/premiere.html
Final Cut Pro (Mac): http://finalcutpro.com
Microsoft Expression Encoder 4 (PC): http://bit.ly/1AHQ0vz
Apple Quicktime Player (Mac): part of OS X
ScreenChomp (iPad)
Coach’s Eye (iPad)
ExplainEverything (iPad)
At least once or twice a week I receive an e-mail asking how I make my screencasts, and given these posts are a couple years old, and I’ve adjusted my methodology a bit in the past few years, it seems high time I provided an update on my recommendations for screencasting. So, here goes.
For those using Windows PCs, not much has changed terribly. I still highly recommend Camtasia:Studio as one of the most cost-effective and easy-to-use software packages for screencasting (make sure you choose Education pricing for a 40% discount). It allows you to record what’s occurring on your screen, as well as your face (via webcam), and puts it all together with a variety of output options. It is my go-to tool when using a Windows system. Typically I create my presentation in Powerpoint, then load up Camtasia to record my walk-through of the presentation, and do a majority of post-processing in Camtasia. Finally, I upload to Youtube and also to the APlusPhysics.com site (many schools block Youtube, so having the videos in a separate place helps teachers provide access to all their students, regardless of location or device). A good example of a video created in this manner is the Kinematics Equations Regents Physics Tutorial.
About 18 months ago, however, I switched from the Windows platform to the Mac platform. The “why” of the change is a long story, and probably not of interest to most readers here, but the transition was much smoother than I expected, and although I realize you pay a premium on the hardware end, I’m much happier with the transition than I initially anticipated. Initially I tried quite a few different methods championed by other teachers using Macs, but everything I tried was either flaky, too complex, or required too much “work” during the presentation — and when I’m creating the screencasts, I want to focus as much of my attention as I can on teaching the material as effectively as I can, with as little focus as possible on technical aspects of screencasting. For those who have been making screencasts, you realize how challenging it is to try to take a lesson, concept, or problem-solving approach and condense it down into just what the students need to know to get started. My goal in my videos isn’t to replace the classroom or teacher, but rather take the repetitive basic content and condense it down into something the kids can do at home, leaving us more time in class for hands-on activities, exploration, extension, and challenge work.
Without digressing TOO much further, I soon decided I had to come up with my own method. After a bit of trial and error and the purchase of several software packages that just didn’t work out for me, here’s the method I came up with (and am quite happy with). First, I create my presentation materials in either Powerpoint or Keynote (I prefer Keynote on the Mac to Powerpoint on the Mac just for level of integration, but they’re pretty much equivalent). Once my presentation slides are complete, I export them in PDF form. Then, I import the PDF presentation into a wonderful Mac software package known as Curio (HIGHLY recommended and comes with amazing developer support), “Spread” the PDFs out onto various pages, and I use Curio as my background software when I run my screen capture.
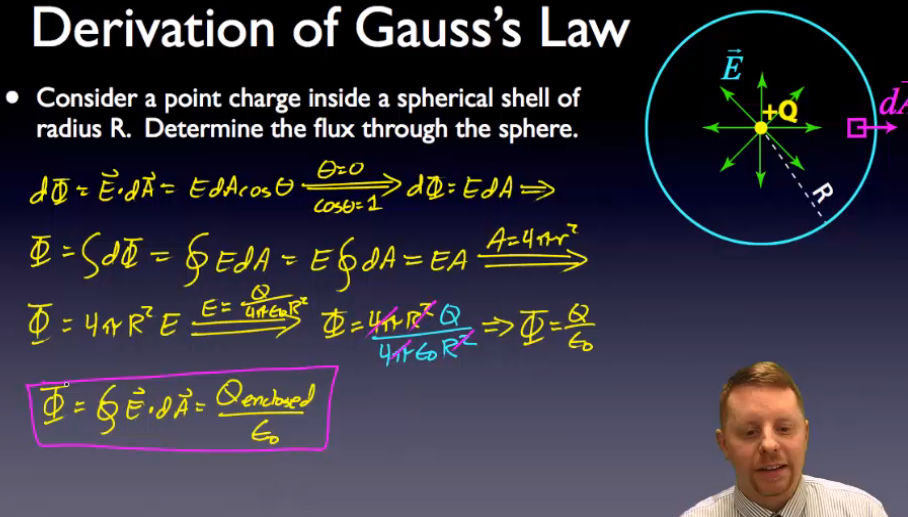
For the actual screen capture work, I went back to Techsmith’s Camtasia:Mac. It doesn’t have quite as many features as the Windows version, and post-processing is considerably less intuitive if you want to zoom, scroll, etc., but for the basics it’s pretty slick, and it also has one more GREAT feature that I love — the ability to remove a color from your recorded webcam video. This means you can do some basic “green screen” or “chromakey” work right in Camtasia:Mac. I’m not thrilled with the level of control of this feature, as there’s definitely some room for improvement, but it’s a great start and its easy integration right into the regular workflow makes it quick and easy to implement. The AP Physics C: Gauss’s Law video demonstrates a screencast created with this workflow. As an added bonus, Camtasia for Mac is also considerably cheaper than the Windows version, currently about $75 for an academic license.
Which leads us into the tricky part, the hardware. The most important part of your setup, from my perspective, is your writing input device. On the Windows side, for years I’ve used a Tablet PC (not an iPad or similar device, but rather a laptop computer that has a screen you can write on). These tend to be rather pricey (prices typically start around $2K for a decent system), and I haven’t had the greatest luck with them as far as reliability goes, despite attempts at buying high-end systems. What I consider a better alternative is the purchase of a separate input device, so that you can always upgrade / swap out the computer itself as needed, but continue using the input device from system to system.
Initially I started working with a Wacom Intuos tablet. It does what it’s supposed to, but I had a heck of a time looking at a separate screen while drawing on a separate input device. My handwriting was awful (even more awful than when I write directly on the screen), and I found myself stressing about the technicalities of the screencast as I worked. It just wasn’t comfortable at all. So, the barely-used system is sitting under my desk waiting for me to either put it up on eBay, loan it to another APlusPhysics contributor, or sell it for pennies on the dollar.
Shortly thereafter, I decided to take the plunge and purchased a Wacom Interactive Pen Display, model DTU-1631. I use this in my classroom each day as well, projecting the DTU-1631 screen on a digital projector, and writing my notes directly on the screen. This has the extra advantage of allowing me to capture all my class notes and publish them directly to our Regents Physics and AP Physics C blogs. It’s not the greatest monitor as far as overall image quality, and it’s certainly priced above where I think it should be (~$1000), but it works, and has become my everyday workhorse in the classroom. I’m pleased to see Wacom is coming out with some considerably upgraded interactive pen displays this summer, which may provide some further options.
I also invested in a system for home use this past fall, saving me the hassle of lugging the DTU-1631 back and forth from school to the home office regularly. Without the need to project the monitor, I decided on the Wacom Cintiq 22HD system. Again, the monitor image characteristics leave a bit to be desired in a high resolution monitor, but the ability to write directly on the screen at high resolution takes all the technical hassle out of creating screencasts. It’s not for the dabbler, however, as discount price is typically right around $2000.
Blue Yeti USB Microphone
As far as audio and microphones go, I continue to use a Zoom H2 Digital Recorder at home, which does a nice job of capturing audio cleanly at a price point around $180 with a bit of searching, but a year or so ago I purchased a separate Blue Yeti USB Microphone and I absolutely love it. It’s easy to use, has a tremendous cardiod mode, and provides awesome sound in a cheap, reliable manner. At a price point of roughly $100, I don’t think you can beat it, and it wouldn’t take much for me to trade in my more expensive Zoom H2 for a second Blue Yeti for the home office.
As far as webcams to capture the instructor’s face, just about any Logitech-type USB webcam will do. I’ve used a number of different webcams, most recently a Logitech HD Webcam C615 (due to its Mac compatibility). They do a decent job. For the higher-end videos using the chromakey (green screen) technology, I wanted something a little better, and found an outdated Canon ZR850 sitting in our closet. This mini-DV camcorder didn’t see much use in our house due to the advent of all the flip cam technologies, iPhones, etc., but I found that by connecting to my Mac through its firewire connections, I could get high quality, stable images fed directly into the computer and compatible with Camtasia. Certainly not a necessity, but a nice little extra.
Finally, in the interest of full disclosure, I do just a touch of post-processing on my videos outside of Camtasia. Although Camtasia has noise reduction algorithms built in, I had already purchased a license for the full Adobe Creative Suite (Master Edition) to build the APlusPhysics website, so thought I might as well use as many features of the software as I can. I use Adobe Audition to tweak the audio input from my microphones just a touch before final processing. This allows me to easily standardize volume levels, pull out 60Hz hum from the electrical system, and even remove a bit of the HVAC noise from my recordings. Certainly not necessary for a good screencast, but a little extra since I already had the software on my system.
There are certainly cheaper ways to do screen casting, and many great free to nearly-free alternatives. I’ve chosen this route with the goal of spending my time and resources up front to create high quality videos that I can use for years and years, tweaking and re-doing individual videos on a piecemeal basis to continually improve the quality of the video collection, as opposed to redoing the course year after year. There are certainly other strategies and workflows, but I’m hoping this may provide at least a start to others who are interested in screencasting without having to travel down all the mistaken paths I had to in developing this methodology. Make it a great day everyone!
Although I don’t typically consider an iPad a Tablet PC, I know a number of readers have expressed an interest in projecting presentations using their iPad. I was listening to a podcast early this morning and heard a teacher talking about how he manages to do this, which especially caught my attention when he mentioned he uses it for Free Body Diagrams (aha! A physics teacher!).
The physics teacher uses an iPad coupled with the AirSketch application to project PDF files and then sketch on the iPad as he walks around the room. I don’t have much in the way of details past that, but I can tell you that you can find this short demonstration video in the video version of the iPad Today Podcast, Episode #33, about 43 minutes into the show.
Good luck all!
(Also of note, the creators of AirSketch, QRayon, also advertise a software program that allows you to wirelessly project without a USB dongle over WiFi with their software package Air Projector – Only ofr iPod Touch / iPhone, and soon for iPad, but could be another useful tool for iOS fans.)
One of the greatest benefits of using a Tablet PC is the ability to create short videos walking students through lectures or problem-solving exercises. Sure, you can create hand-outs showing step-by-step problem solving, but it’s hard to beat an audio and video combination where you explain each step as you perform it – not quite as good as the live instructor model, but a close second, especially in situations where you have students in your classroom working on different topics, or the student can’t be physically in the classroom!
Screen Capture Software
There are a variety of software packages available that allow you to do this, with just as wide a variety of bells, whistles, and prices. These “screen capture” packages record whatever is shown on your screen (or a subset of your screen) along with audio through a microphone input, and output a digital video file in one format or another.
Starting at the high end, Techsmith’s Camtasia Studio is the Cadillac of screen capture. Not only does it include just about any bell and whistle you can think of, it also includes an integrated editor that allows you to jazz up your video before publishing to formats ranging from Flash for the web to iPod-compatible videos to Youtube directly. The downside – it lists at $299, with an educational discount down to $179 (and if you do decide to go this route, I’d recommend going the extra mile and purchasing the bundle that includes SnagIt for $199, a screen capture utility that you’ll fall in love with). You can try it out for 30 days for free — its features certainly justify the price if you’re going to use the software extensively, but for just starting out, there are simpler and cheaper options.
At the next tier, you can find a wide variety of screen capture software from lesser-known and considerably lower-support firms. I’ve been using BSR Screen Recorder 4 over the past few years, which was roughly a $30 purchase at the time. The new version, BSR Screen Recorder 5, is available for download for $50, and includes output options to AVI, Flash, and WMV. I can’t speak to the newer version of the software, but BSR4 has performed admirably for me for videos of 10 minutes in length or less. I’ve used this software for everything from movie analysis problems to mini-lectures to flash video creation for the APlusPhysics.com website.
In general, the software works fine for its intended purpose, but if you run into trouble, I wouldn’t expect the same level of support you’d get from the higher-end products.
Another potential software package for video screen capture is the open-source (i.e. free) CamStudio, based off an earlier version of the now-commercial TechSmith Camtasia package. I haven’t used this myself, but it comes highly recommended from a well-respected colleague who has used it to make quite a number of instructional videos using his tablet pc.
Finally, I’d like to point out a free software package called LectureScribe put together by Brian C. Dean, a computer science professor at Clemson University. LectureScribe is a slick little flash video creation program designed by a teacher for teachers. It takes a bit of getting used to, but if you want a no-frills package to get you started, LectureScribe is your answer!
Microphones
As far as microphones go, you can get away with the built-in mics in many laptops and web cams. Of course, with microphones, you typically get what you pay for. Decent USB microphones can be obtained for $30-$50. I use a Zoom H2 portable digital recorder ($145 at Amazon), purchased a couple years back as a multi-function device. Students use it in class for our Physics In Action podcast, I use it for creating multimedia videos, and outside of school I’ve used it for recording a reading of books onto CD for my daughter as a Christmas present. It’s a relatively high quality microphone that automatically converts its input into digital files, so it’s very portable, or you can plug it directly into a computer for use as a microphone. For simple video recordings, however, this is probably overkill.
Workflow
The easiest way I’ve found to create these videos is to place the problem in Bluebeam PDF Revu before starting the recording. Then, set up your microphone and screen capture software to record the Bluebeam window. Next, solve the problem just as you would in your class, explaining your steps as you go. Finally, hit the “stop record” button in your software, and save your video file to a format that best meets your needs!