Over the past few months I’ve answered a number of questions from various sources (most commonly, the AP Physics Listserver) surrounding the use of tablet PCs in the classroom. Given their burgeoning popularity, this series of posts is an attempt to document best known methods for utilizing these tools effectively, with a specific focus on physics education.
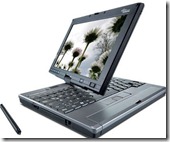
Tablet PCs mean many things to many people. For the purposes of this discussion, we’ll consider a Tablet PC to be a laptop computer which includes a stylus you can use to write directly on the screen, or a laptop or desktop computer which includes an electronic tablet and stylus (such as the Wacom Bamboo Tablet).
 I’ve used tablet PCs in my teaching for roughly five years now, and though by no means an expert, I have had the opportunity to find plenty of things that do and don’t work. This series of articles is an attempt to share what I’ve learned and answer many of the questions that keep recurring on the listserver. Much of what I’ve learned has been through the support and advice of the online community, and likewise, I’m hoping that others with experience and expertise in this arena will share their thoughts and best known methods. Tablet users, I welcome your feedback, comments, additions, and modifications.
For our first article, I thought it might be worth taking a few minutes to showcase some of the ways a Tablet PC can be used in the classroom. This showcase is by no means exhaustive and will hopefully remain a living, growing exhibition.
Presentations & Notes
The Tablet PC can be used in place of a Smartboard when combined with a digital projector, and is, in many ways, superior to a Smartboard. For starters, it is typically easier to write neatly on a tablet PC compared to a Smartboard, whiteboard, or chalkboard. And with the right software, you also pick up a wider array of communication tools, ranging from pen types, sizes, and colors to geometric objects, tables, pictures, and even hyperlinks.
 I use Bluebeam PDF Revu to document my presentations to the class by projecting a “clone” of my tablet screen for the class to see. Not only can I write neatly for my students, but I can also have my course outline right beside me as I lecture, assisting in maintaining organization and insuring I hit all the key points for each topic. If my presentation includes a web resource such as a PHET simulation, I can link to it directly from my notes screen, avoiding awkward fumbling and keying in of website URL’s in the middle of a lecture.
Most importantly, when the presentation is complete, I can easily copy and paste my notes directly into blogging software and publish it to the web. Thirty seconds after the end of class, students have access to the entire day’s notes on our course website… an invaluable aid for students who aren’t able to attend class, as well as for students with special needs who require a copy of course notes.
Check out more details in the articles “Presenting and Blogging with a Tablet PC” and “Presenting with a Tablet PC: The iPad”
Problem Solving
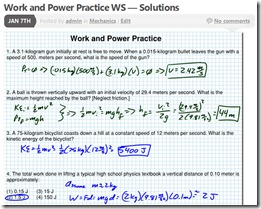
Often times I find it useful to solve problems with my students in a step-by-step fashion. This is useful as part of a lecture presentation, for homework review, and for review of formal assessments to assist students in working through a logical problem solving methodology. Using a Tablet PC in combination with PDF software such as Bluebeam PDF Revu, I can scan the homework or assessment sheet into a PDF file, project it, and mark it up in real time as we solve problems together.
It’s also quite easy to set up problems in advance, copy and paste a picture or two from the web to spice up the problem, and have students work in groups (typically with whiteboards) to solve the problem. As I wander around the room examining student work, I can hand the Tablet PC to students who have developed unique or model solutions. They share their solutions using the Tablet PC as they talk through their thinking, and the “coolness” factor serves as a reward for both the presenters as well as the class, leading to the educational nirvana of students teaching students. Interesting problems can again be cut and pasted into blogging software for sharing with all students with just a few seconds of extra effort.
Video Guides
Of course, online notes don’t take the place of a live instructor modeling problem-solving in real time. For cases where this just isn’t practical for all students all the time, you can capture audio and video of the instructor solving the problem. Screen capture software is readily available for Tablet PCs, ranging in cost from free to several hundred dollars, depending on the required functionality. Throw in a low-cost microphone, built-in on many systems, and you have everything you need to create your video. You can even pull your example from a video elsewhere on the web and combine it with your scientific analysis to create an informative and entertaining mini-video that will get your students talking about where they see physics each and every day outside the classroom! Sharing with your students is just as easy – post on YouTube or TeacherTube, embed the file in your blog along with your class notes, and you’re well on your way to creating an amazing online resource for your students!
Over the next several articles in this series we’ll delve into each of these applications in more detail, sharing best known methods and techniques for utilizing Tablet PCs in education, ranging from software and hardware reviews and recommendations to how-to guides for specific applications. So pull up a chair, make yourself at home, and share your tips, tricks, and expertise with our growing community!

Pingback: Presenting and Blogging with a Tablet PC | Physics In Flux
Pingback: Top 100 High School Teacher Blogs
Pingback: laptops for students
Pingback: Top 100 High School Teacher Blogs - L I V A