Creating Screencasts (Mac) – 2017 Update #edtech #flipclass

So, it’s been a few years since I’ve detailed how I make my screencasts, and my workflow and equipment have evolved as I’ve added a few bells and whistles in an attempt to make the screencasts look a touch more professional (and more fun).  Some things have stayed the same, and others, well, not so much.  Here’s the basic workflow.

The Computer

27" iMac
27″ iMac

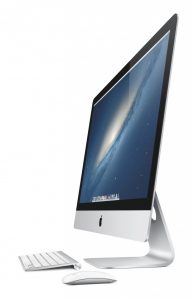
I’m still working on a Mac platform, doing most of my work on a 27-inch 2013-vintage iMac.  I try to keep up to date with the latest version of the operating system, which is currently OS X Sierra.  The iMac includes the higher-end graphics card (NVIDIA GeForce GTX 780M 4096 MB), has an i7 processor, and I’ve installed 32 GB of RAM.  Typically when I purchase a computer I shoot for a five to six year productive life span, at which point I’ll upgrade to a newer model.  This has worked pretty well for me with respect to my Mac laptops (a MacBook Pro), as the last one was in service for about six years, but I’m anticipating this iMac may continue well past that mark.  It still looks beautiful, runs quickly, and with the amount of RAM and the built-in Fusion Drive, its performance doesn’t appear to be in any danger of slowing down in the near future.

Pen Displays

Wacom Cintiq 22HD
Wacom Cintiq 22HD

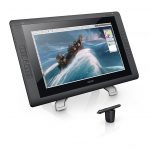
Attached to the iMac I have a Wacom Cintiq 22HD pen display unit, which is basically an external monitor that I can “write on” with a special pen, allowing me to annotate the screen as I talk through the video.  I’ve previously used a Wacom DTU-1631, and am looking forward to trying out the newly-released Wacom Cintiq Pro 16 with a USB-C enabled MacBook Pro.  Though the Wacom pen displays are a very significant investment, I’ve been very impressed with their quality and longevity.  The DTU-1631 has lasted five years in the classroom with heavy daily use, and the Cintiq 22HD is just shy of five years of service (though a much lighter workload) and could easily pass for brand new.  These monitors also hold their value extremely well over time.

Audio & Video

Blue Yeti Microphone

I’ve gotten a ton of mileage out of my Blue Yeti USB microphone… I’ve tried a number of other mics, including lapel mics, and microphones that cost more than three or four Blue Yeti’s, but I haven’t found anything that compares to the quality of the Blue Yeti, especially at its very reasonable price point.  If you want to upgrade your audio from the built-in microphones, this is a very solid choice, and another piece of electronics that has held up well for more than five years of service.

Canon Vixia HF G20
Canon Vixia HF G20

I’ve put together a small office in my basement to allow for a fairly quick and seamless transition to video creation mode, which includes a foam green screen (and stand).  Especially if you’re just getting started, something as simple as a green flannel blanket can work, though I have to admit, the foam green screen has held up extremely well these past few years (even with the dog sleeping on the portion that sits on the floor at least daily).  They sell rather expensive lighting clips to hold the green screen to the stand, but I found quality clips at a much more reasonable price at the local hardware store.

Genaray SpectroLED
Genaray SpectroLED

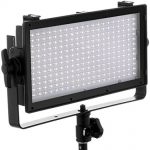
For illumination, I use a couple of super-cheap reflector work lights coupled with a Utilitech Pro floor LED and a Genaray SpectroLED SP-E-240D mounted on the ceiling.  With a little bit of playing, I can obtain pretty reasonable uniform green screen illumination.  I also use a couple of desktop clip-on lamps to illuminate the foreground (i.e. — my face) in the videos.

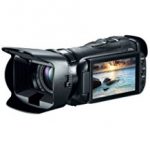
To record my face in the videos, I’m using a Canon Vixia HF G20, saving the digital video file onto an SD card.  Most any digital camcorder or webcam can do the job, however.  While the Canon is recording my face, I’m separately using the iMac and Telestream’s Screenflow 6 (Telestream JUST released Screenflow 7, but I haven’t tried it out yet) to record the Wacom Cintiq screen, as well as recording the input from the Blue Yeti microphone.

Recording

Prior to any recording, however, I create my “slides” for the screencasts using Apple’s Keynote software, and export those slides as a PDF.  I then open the PDF using Zengobi’s Curio software, which is the software actively running on the Wacom screen that I use to annotate the slides.  If you haven’t tried it out, Curio is a pretty amazing piece of software that allows you to do so much more than just write on PDF slides…  if you have a Mac, it’s worth checking out for a variety of purposes!

So, the workflow.  With everything set up, I have Screenflow 6 start recording the Wacom screen while recording the Blue Yeti mic, and simultaneously I start up the Canon video camera.  Once I’ve gone through the lesson, I stop Screenflow from recording and stop the Canon video camera.  I should now have an SD card that contains the digital video file of my face (with sound recorded from the Canon’s rather poor microphone), and a Screenflow 6 file that has video from the Wacom screen coupled with the Blue Yeti-recorded sound.

Now it’s time to put the video all together.  First I export the digital video file from Screenflow 6, taking care to export at 29.97 fps and not 30 fps so that it will match up to the Canon digital video file.  Then, using Final Cut Pro on the Mac (coupled with the Motion and Compressor add-ons), I create a project and import both the recorded screen video file and the video camera file.  Using Final Cut, I create a combined clip from these two files and have Final Cut Pro sync them up based on the audio (although the sound from the Canon camera is poor, it’s good enough to sync the clips together).  Next, I mute the sound from the Canon camera, so that I now have my recorded screen video below my “live action” video, but using only the sound from the recorded video screen, which was recorded with the Blue Yeti mic.

Editing

Chroma Key Effect
Chroma Key Effect

Next it’s time to edit.  First step is to take care of the green screen effect (formally known as chroma key), which Final Cut Pro does quite easily.  I remove the green color from the “live action” file using the “Keyer” effect, and tweak it as needed to get the desired result.  I then shrink the clip down and position it where I want, so that I have the live video taking up just a small portion of the screen, the background green from the video shows as transparent, and what shows through from underneath is the recorded video from the Wacom screen.

The hard part’s done.  Final steps now involve fixing any audio issues, clip editing if necessary, adding any titles, and appending on the opening and closing video sequences, which were created using Adobe Premiere Pro, After Effects, and Audition from Adobe Creative Cloud.  Once I have the video looking the way I want in Final Cut Pro, I use Compressor to export it in multiple formats — high definition video for YouTube, and an APlusPhysics-specific size and quality for viewing directly from the APlusPhysics site.

Next Steps

Moving forward, I would really like to spend some time working with my old iPad to see if I can re-purpose it for use as a teleprompter.  I tend to spend a lot of time up front planning my videos, but still have yet to come up with a slick, efficient way of presenting notes to myself while I’m making a video.  I have to believe there’s a reasonable way to have my notes show up on my iPad and use some sort of remote (perhaps my phone?) to scroll through PDF notes on my iPad as necessary.  Currently I tend to tape my paper notes to the bottom of the camera, which is chock-full of problems, messiness, and opportunity for improvement.

Back to Reality

If it sounds like there’s quite a bit of work involved, you’re not wrong, but don’t think you have to go to anywhere near this level of complexity or expense to make quality screencasts.  My workflow has evolved over the years as I’ve tinkered and gone through a length set of try/fail sequences to learn what works for me and provides the level of quality I’m after.  Much of what I do can be accomplished in a similar manner using fairly basic tools — Techsmith’s Camtasia software coupled with a Webcam, a USB lapel mic, and most any digitizing tablet will get you pretty solid results without a huge investment.

Even though this article is a technical how-to / what do I use, I’d still like to end with two bits of advice I’ve learned from doing things the hard way more times than I can count.

  • First, and foremost, a flipped classroom is NOT about the videos, it is about building more in-class time for active learning strategies such as hands-on activities, group problem solving, deep-dives into a topic, discussions, etc.  The videos themselves are such a tiny part of the whole equation, and are primarily a means to create more available class time.
  • Second, though it can be fun to doctor-up your videos and add all sorts of bells and whistles, realize that these embellishments and investments of time and resources have extremely minimal payback in the form of student learning and performance.  If you’re interested in doing these things, make sure you’re doing them because you want to and think it’s going to be fun, but don’t expect to see any sort of substantial learning improvement with higher quality videos (which brings me back to item one… it’s not about the videos!)

Useful References

SBG Reflections 3/4 Through the School Year #physicsed #SBG #flipclass

What I’ve learned by implementing Skills Based Grading (SBG) in my physics classroom this year…

  1. The skills required for success on the end-of-year state Regents Physics exam are but a small subset of the skills I teach in my class. I had hoped this was the case — every teacher wants to think they teach beyond the minimum requirements of the curriculum, but having it in front of me in black and white reinforced this, and also allowed me to pick a topic or two for a “deep dive,” without fear of shorting the students on material they need to be successful on their final exams.
  2. Students who take the time to “shore up their learning” and reassess in an ongoing manner quickly learn how to learn in my class, and rarely need the opportunities for continued reassessment. After a few weeks of the SBG program, those who “drink the SBG Kool-Aid” learn exactly what they need to study and execute on their assessments, and therefore are better prepared for the initial assessments with no need to undertake reassessments.
  3. Students who slack during the first part of the year and dig themselves a hole have considerably less success in reassessing a multitude of skills later in the year… at this point the SBG system becomes an exercise in grade improvement instead of learning.  Next year, I plan on putting a two-week limit on reassessments to both save my sanity in grading as well as encouraging students to avoid this situation.
  4. Grades hg clrNot all assignments need to be graded. Many of our labs and hands-on projects serve to build understanding, but a full rigorous assessment of these multi-faceted projects is complicated in an SBG system.  After struggling with this the first half of the year, I realized that I could assess these projects based on a single skill, or at times, not at all.  It’s important to keep in mind the ultimate goal is student learning and understanding, NOT grading.  The more I embrace this fundamental change in thinking, the more freedom I enjoy in designing activities to allow students to build their own understanding.  Grades are NOT the goal, learning is.
  5. Automated scoring / feedback systems for exams is a huge timesaver. Last year I invested in Remark OMR software, which allows me to set up exams and have the results automatically scanned and tabulated, providing separate feedback on any number of skills from the same written assessment.  Without spending hours and hours grading, I take the time to set up a quality assessment up front, program the software to give me the information I need, and the actual grading takes minutes.  Further, by taking the time to set up these assessments now, I’m building a library of assessments I can pull off the shelf in the future.
  6. The flipped classroom videos I created to help students who missed class for various reasons provide an excellent introduction to topics. Toward the second half of the year I began assigning students to watch the videos as homework to introduce and / or reinforce the basic problem solving skills required for the topic under study.  Since I began this practice, activities and labs have gone more smoothly, students have become more independent in their problem solving, and the quality of questions and discussion in the classroom has gone up tremendously.  I would surmise that because students feel more comfortable in the “standardized problem solving” after having watched these videos, they feel more open to taking the next step and pushing their understanding to the next level.
  7. Students who didn’t do their work in the old system didn’t do their work in the new system. It shouldn’t have been a surprise, but the SBG system is not a silver bullet.  Regardless of assessments, classroom styles, etc., I can’t force students to learn.  Only by active engagement and hard work is anything worthwhile undertaken successfully, and my physics classroom is no exception.  You can lead a horse to water, but you can’t make it drink.
  8. My time allotment with students needs more thought. In the words of a colleague of mine, you can take the horse to the water, then hold its head under the water until the liquid soaks through its pours and it ingests the water forcefully.  I’ve tried this brute force method with a few students who I just couldn’t seem to engage this year.  I’ve pulled them in for (in)voluntary extra sessions, hounded them both in class and out, and all but pushed the hand holding the pencil, with mixed success.  In some cases the students have pulled through and improved, but I’m not certain the effort is being focused on the right students.  When I do this, I spend 80% of my time with the bottom of my class — is this really fair to the remainder of the class, those who are engaging and interested?  Further, am I instilling a total hatred of science and physics and school in the students I’m trying to pull along?  This definitely requires more thought.
  9. There is still a place for the “drill and kill” method of problem solving practice. I love inquiry-based activities, and students building their own understanding, utilization of the modeling cycle, but learning how to solve standardized problems quickly and efficiently is also a requirement in our school system, and there really is no substitute for just diving in and practicing.  I’m not advocating this as a “day after day after day” strategy, but without fail, my students’ assessment scores and understanding levels go up when they’ve had the opportunity to work through problem sets and receive feedback on their work.
  10. I am 100% certain I want to continue utilizing SBG in my Regents Physics classes next year. I feel the methodology has clarified our course objectives, reduced student stress, and helped emphasize learning while de-emphasizing grades in our classroom.  Students get detailed feedback on strengths and weaknesses, and those who utilize the system correctly develop individualized learning plans tailored directly to their needs — individualized self-directed differentiation.  Of course, I see many opportunities for improvement in the classroom, things I want to change next year, and items I’m still not sure how to best attack — but implementation of SBG this year has helped both my students and myself, and it has also emphasized my primary goal for students each year: teaching students to be independent learners.

Videos, Khan, and the Flipped Classroom #physicsed #edtech

The past couple years have brought about a flurry of excitement, energy, drama and debate in the world of physics education, and in K-12 education in general.  A lot of great information has been shared, and a lot of misinformation has also been distributed.  As a teacher learning my way in this dynamically charged environment, I think it’s worthwhile to try and distill down some of the hotly-contested topics into what they mean for my classroom.

NewImage

Let’s begin by taking a look at what is being said about some of these topics.  First, the Khan Academy has been receiving substantial notoriety as of late, largely fueled by Bill Gates’ sponsorship.  The Khan Academy began as a project by Sal Khan to create videos to assist his niece in her classes.  In and of themselves, the physics videos can be a helpful review… if you look closely, you can, of course, find a number of opportunities for improvement as well as statements that may lead to misunderstandings, but there is definitely value here when used appropriately.

Second, the “Flipped Classroom” movement has been gaining notoriety of late, even though the concept has been in practice in many classrooms for many, many years.  In its current implementation, the popularized version of the flipped classroom infers teachers creating video lectures for students to watch as their homework assignments outside of class, leaving more valuable in-class time for hands-on activities, active engagement, problem solving and practice where the teacher is available to coach and guide, etc.  This, of course, has been a standard practice in literature classes for many, many years (read the book at home, discuss in class), but the implementation version with teacher-created videos is becoming more and more popular as the technology to create and share videos becomes more accessible.  Further, the independence with which students can access differing information on their own timeline opens up further options for Mastery Learning, which can move the classroom toward an environment where students learn at their own pace.

Search the Internet and it doesn’t take long to find a wide variety of stances on these resources and how they are used.  Taken to the extreme or over-popularized by the media, the true intent of these resources can quickly become distorted.  As an example, some are calling for the use of video lectures to take the place of trained teachers in classrooms, “streamlining” education for all.  This is a dangerous path to take, particularly in the realm of science, as “teaching is really about creating experiences that allow students to construct meaning,” according to Frank Noschese in his Action-Reaction blog, and backed up by volumes of physics education research (PER).

This does not mean, however, that the videos don’t have value.  They can be a resource, a tool, to be used in conjunction with a number of other tools, methods, and strategies to optimize education for each and every student.  Do video lectures by themselves build true understanding?  Of course not!  I think it’s obvious to anyone who has worked in education that building meaningful understandings and connections isn’t facilitated by a passive observation of a lecture, whether delivered through video or in person.  However, using a short video to highlight key “take-away” concepts, reinforce basic applications, facts, formulas, and vocabulary, demonstrate problem-solving methodologies, or to provide a review or synopsis for those who need a refresher or missed a class or two can be a very effective way to individualize instruction to a student’s needs.

Three years ago I began creating videos for my Regents Physics classes, having completed a set of 80+ videos this year covering the entire Regents Physics curriculum (http://www.aplusphysics.com/courses/regents/videos/vid_index.html).  My goal wasn’t to replace my classroom instruction or activities, but rather to provide another tool to help students be successful.  These videos allow students who miss classes for various reasons to come back to class with a head start on their catch-up work.  They also allow me to divert some of the less-effective (but occasionally necessary) direct instruction to “at-home” time, providing more in-class time for activities which build deeper understandings, such as our catapult projects, building of iPod speakers, and water bottle rockets, all which allow students to make connections across concepts and subjects, explore and analyze data to come to their own conclusions, and perhaps most importantly, foster confidence in independent learning.  Finally, students have fed back that these videos can be a great refresher as material gets stale, or at times provides a different look at a given subject, helping solidify areas of confusion.

Last night, for example, I was floored to receive a letter in the mail from a student I’ve never met.  In the letter, the student stated:

“Your videos helped me understand the questions we went over in class. I used your site to study for my midterm… and [now] more fully understand the topics.”

These videos, and others like them, are certainly not “the answer.”  But receiving this unsolicited letter from a student in a district I’ve never visited affirmed for me that they can be a valuable resource, and even if it’s only helping out the occasional student, isn’t that really what our jobs are about — finding a way to reach as many students as possible?

There is no magic bullet in education.  Effective instruction is a constant struggle to best meet the needs of ever-changing individual learners in a constantly changing society.  Strategies that are effective one year may not be effective next year.  Or methods that reach one student may not work for another student.  It is our challenge to try and meet the needs of as many of our students as we can on a day-by-day basis, working to help all of our students reach their potential and succeed.  Research has shown repeatedly that active learning and meaning-making provides deeper, longer-lasting understanding.  History and experience have also taught us that there is a time and place for direct instruction, though few would argue it is a but a small component of a highly effective classroom.

Videos can be used effectively to help meet these needs in different ways for different students, and are in and of themselves neither completely good nor completely evil.  Instead, they are yet another resource in a teacher’s arsenal.  Given the tremendous variety of students and challenges we face every day as educators, I want access to each and every resource I can get my hands on.