After many, many long hours and tons of great feedback from physics teachers across the globe, I’m thrilled to announce the AP Physics 1 Essentials, a guidebook / review book for the upcoming AP Physics 1 course, is due for release in late August. I began work on this project in the summer of 2010 when conversations at the AP Annual Conference in Washington, D.C., led to a number of different teachers talking about the need for a detailed course breakdown to support the change, followed by discussion of what the true cost of the change would be in terms of instructor hours, curriculum rewrites, resource revisions, etc. It was obvious there was going to be a need for a guidebook for the course, and my goal was to provide a short “everything you need to know” book that was easy-to-read, fun, engaging, and inexpensive so that students could pick this up as a guidebook/review book without having to purchase entirely new textbooks to support the changing course.
I quickly picked up a following of fans eager to see the project succeed and more than willing to contribute what they could, from early draft versions of the Division of Content plans (which only vaguely resemble the final curriculum guides), to proposed and/or recommended formula sheets, to technical reviews, editing, “wish lists,” etc. I’ve been amazed at the positive response and helpfulness of so many, that has allowed this project to progress through multiple obstacles, from revised content and organizational issues through technical hurdles such as a corrupt book file caught nearly 80% into the rough draft. I guess this qualifies as checking the “nothing worthwhile is easy” box on the project.
I’m grateful to my family for allowing me the many hours early in the morning, late in the evening, and during the summer to work on this effort. As I write this, for example, I’m on vacation with my family. It’s almost 6 am, I’m watching the Allegheny River flow past, and just saw a bald eagle fly up the river, not 30 feet from where I sit typing. I also must thank the many physics instructors across the globe who have contributed in so many ways, from editing to hints to encouragement… but I need to say a special thank you to the APlusPhysics community. The website began as a tool to use in my own classroom, and quickly grew so popular that I felt compelled to continue to expand it at the request of its users. With more than 30,000 students using it EACH MONTH, I’ve been absolutely floored by the number of thank-you messages, letters of encouragement, and success stories contributed voluntarily by community members. You guys set me on this path, made the site and the books successful, and it’s your encouragement and support that have kept me at this project through the wee hours of the night and long hours of frustration.
Moving on to the final product… I’m proud to say the book is finished. Sure, it has a few more edits to make, a few more tweaks here and there, but everything is on track for a late August 2013 release. My long-term goal was to have the book released one year before teachers began teaching the revised AP course, and it appears we’ll hit that deadline on the nose (with special thanks to the AP for delaying the change a year from the date I was originally told back in the summer of 2010). I’m hoping you find it valuable to your courses and studies. This book was written as the guidebook I would want my students to have for the course. Not a full standard physics textbook, because my students don’t learn and fully read their physics textbook (except in snippets), but rather a book designed to be used as written, read AND understood, with tons of example problems and solutions.
Thank you so much for your tremendous support. I hope you enjoy AP Physics 1 Essentials as much as I enjoyed the opportunity to work with you and so many other amazing people on this project.
At least once or twice a week I receive an e-mail asking how I make my screencasts, and given these posts are a couple years old, and I’ve adjusted my methodology a bit in the past few years, it seems high time I provided an update on my recommendations for screencasting. So, here goes.
For those using Windows PCs, not much has changed terribly. I still highly recommend Camtasia:Studio as one of the most cost-effective and easy-to-use software packages for screencasting (make sure you choose Education pricing for a 40% discount). It allows you to record what’s occurring on your screen, as well as your face (via webcam), and puts it all together with a variety of output options. It is my go-to tool when using a Windows system. Typically I create my presentation in Powerpoint, then load up Camtasia to record my walk-through of the presentation, and do a majority of post-processing in Camtasia. Finally, I upload to Youtube and also to the APlusPhysics.com site (many schools block Youtube, so having the videos in a separate place helps teachers provide access to all their students, regardless of location or device). A good example of a video created in this manner is the Kinematics Equations Regents Physics Tutorial.
About 18 months ago, however, I switched from the Windows platform to the Mac platform. The “why” of the change is a long story, and probably not of interest to most readers here, but the transition was much smoother than I expected, and although I realize you pay a premium on the hardware end, I’m much happier with the transition than I initially anticipated. Initially I tried quite a few different methods championed by other teachers using Macs, but everything I tried was either flaky, too complex, or required too much “work” during the presentation — and when I’m creating the screencasts, I want to focus as much of my attention as I can on teaching the material as effectively as I can, with as little focus as possible on technical aspects of screencasting. For those who have been making screencasts, you realize how challenging it is to try to take a lesson, concept, or problem-solving approach and condense it down into just what the students need to know to get started. My goal in my videos isn’t to replace the classroom or teacher, but rather take the repetitive basic content and condense it down into something the kids can do at home, leaving us more time in class for hands-on activities, exploration, extension, and challenge work.
Without digressing TOO much further, I soon decided I had to come up with my own method. After a bit of trial and error and the purchase of several software packages that just didn’t work out for me, here’s the method I came up with (and am quite happy with). First, I create my presentation materials in either Powerpoint or Keynote (I prefer Keynote on the Mac to Powerpoint on the Mac just for level of integration, but they’re pretty much equivalent). Once my presentation slides are complete, I export them in PDF form. Then, I import the PDF presentation into a wonderful Mac software package known as Curio (HIGHLY recommended and comes with amazing developer support), “Spread” the PDFs out onto various pages, and I use Curio as my background software when I run my screen capture.
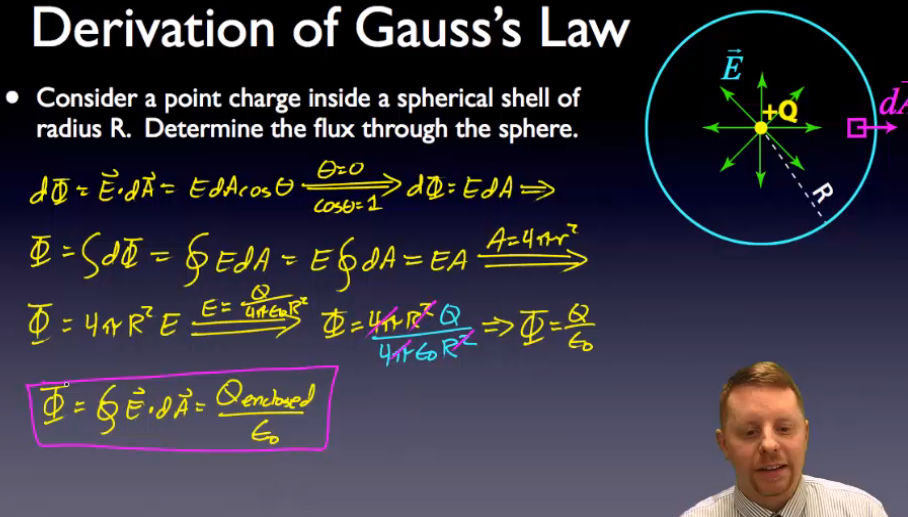
For the actual screen capture work, I went back to Techsmith’s Camtasia:Mac. It doesn’t have quite as many features as the Windows version, and post-processing is considerably less intuitive if you want to zoom, scroll, etc., but for the basics it’s pretty slick, and it also has one more GREAT feature that I love — the ability to remove a color from your recorded webcam video. This means you can do some basic “green screen” or “chromakey” work right in Camtasia:Mac. I’m not thrilled with the level of control of this feature, as there’s definitely some room for improvement, but it’s a great start and its easy integration right into the regular workflow makes it quick and easy to implement. The AP Physics C: Gauss’s Law video demonstrates a screencast created with this workflow. As an added bonus, Camtasia for Mac is also considerably cheaper than the Windows version, currently about $75 for an academic license.
Which leads us into the tricky part, the hardware. The most important part of your setup, from my perspective, is your writing input device. On the Windows side, for years I’ve used a Tablet PC (not an iPad or similar device, but rather a laptop computer that has a screen you can write on). These tend to be rather pricey (prices typically start around $2K for a decent system), and I haven’t had the greatest luck with them as far as reliability goes, despite attempts at buying high-end systems. What I consider a better alternative is the purchase of a separate input device, so that you can always upgrade / swap out the computer itself as needed, but continue using the input device from system to system.
Initially I started working with a Wacom Intuos tablet. It does what it’s supposed to, but I had a heck of a time looking at a separate screen while drawing on a separate input device. My handwriting was awful (even more awful than when I write directly on the screen), and I found myself stressing about the technicalities of the screencast as I worked. It just wasn’t comfortable at all. So, the barely-used system is sitting under my desk waiting for me to either put it up on eBay, loan it to another APlusPhysics contributor, or sell it for pennies on the dollar.
Shortly thereafter, I decided to take the plunge and purchased a Wacom Interactive Pen Display, model DTU-1631. I use this in my classroom each day as well, projecting the DTU-1631 screen on a digital projector, and writing my notes directly on the screen. This has the extra advantage of allowing me to capture all my class notes and publish them directly to our Regents Physics and AP Physics C blogs. It’s not the greatest monitor as far as overall image quality, and it’s certainly priced above where I think it should be (~$1000), but it works, and has become my everyday workhorse in the classroom. I’m pleased to see Wacom is coming out with some considerably upgraded interactive pen displays this summer, which may provide some further options.
I also invested in a system for home use this past fall, saving me the hassle of lugging the DTU-1631 back and forth from school to the home office regularly. Without the need to project the monitor, I decided on the Wacom Cintiq 22HD system. Again, the monitor image characteristics leave a bit to be desired in a high resolution monitor, but the ability to write directly on the screen at high resolution takes all the technical hassle out of creating screencasts. It’s not for the dabbler, however, as discount price is typically right around $2000.
Blue Yeti USB Microphone
As far as audio and microphones go, I continue to use a Zoom H2 Digital Recorder at home, which does a nice job of capturing audio cleanly at a price point around $180 with a bit of searching, but a year or so ago I purchased a separate Blue Yeti USB Microphone and I absolutely love it. It’s easy to use, has a tremendous cardiod mode, and provides awesome sound in a cheap, reliable manner. At a price point of roughly $100, I don’t think you can beat it, and it wouldn’t take much for me to trade in my more expensive Zoom H2 for a second Blue Yeti for the home office.
As far as webcams to capture the instructor’s face, just about any Logitech-type USB webcam will do. I’ve used a number of different webcams, most recently a Logitech HD Webcam C615 (due to its Mac compatibility). They do a decent job. For the higher-end videos using the chromakey (green screen) technology, I wanted something a little better, and found an outdated Canon ZR850 sitting in our closet. This mini-DV camcorder didn’t see much use in our house due to the advent of all the flip cam technologies, iPhones, etc., but I found that by connecting to my Mac through its firewire connections, I could get high quality, stable images fed directly into the computer and compatible with Camtasia. Certainly not a necessity, but a nice little extra.
Finally, in the interest of full disclosure, I do just a touch of post-processing on my videos outside of Camtasia. Although Camtasia has noise reduction algorithms built in, I had already purchased a license for the full Adobe Creative Suite (Master Edition) to build the APlusPhysics website, so thought I might as well use as many features of the software as I can. I use Adobe Audition to tweak the audio input from my microphones just a touch before final processing. This allows me to easily standardize volume levels, pull out 60Hz hum from the electrical system, and even remove a bit of the HVAC noise from my recordings. Certainly not necessary for a good screencast, but a little extra since I already had the software on my system.
There are certainly cheaper ways to do screen casting, and many great free to nearly-free alternatives. I’ve chosen this route with the goal of spending my time and resources up front to create high quality videos that I can use for years and years, tweaking and re-doing individual videos on a piecemeal basis to continually improve the quality of the video collection, as opposed to redoing the course year after year. There are certainly other strategies and workflows, but I’m hoping this may provide at least a start to others who are interested in screencasting without having to travel down all the mistaken paths I had to in developing this methodology. Make it a great day everyone!
Now, this took some research, some planning, and a number of tries, but matching up orbits for docking IS possible…
But certainly not easy. Took a bit of practice (and perhaps a minor bounce off the station…)
But in the end, the Kerbals prevailed.
Once docked, a fuel transfer was initiated to verify the process. After that, it was party time. The Kerbal who’d been manning the space station decided he needed to get out after going a bit stir crazy. Time to ride the rocket for a spell.
This, of course, left the space station unmanned, so one of our newly arrived Kerbonauts transferred himself over to the space station to take the helm.
I’ve been playing around with the Kerbal Space Program recently because (1) it’s fun and (2) I want to know enough to be able to help my kids during their post-AP project, at least from a technical / computer perspective. My mission — have a Kerbal walk on the moon (and return home safely).
The first step was designing the vehicle. I went with a one-man capsule, a small engine, and lots of extra fuel (to give me plenty of room for mistakes on my first landing mission.
I made sure to add landing struts, a ladder to allow Jebediah a quick EVA, and, of course, a parachute for the command pod. The launch vehicle itself was designed in two stages, four large engines and fuel tanks to get the craft past 10 km, and another single large tank and engine to easily push into orbit, leaving the lander vehicle itself fully fueled in orbit.
The launch was very straightforward. I controlled the engines carefully under 10 km to keep the velocity below 200 m/s and avoid overheating. At 12 km I performed an orbital tilt to 45 degrees, got speed up, and then coasted to the highest point in the path, at which point I turned again on an orbital maneuver.
Separation was clean.
This left me with the landing craft fully fueled in a stable Earth orbit, ready to begin maneuvers to head to the Mun.
As I approached the moon I adjusted my orbit to bring me down near “the bright side,” and set my orientation to maintain a retrograde orbit.
After a few minutes of sweating with a light hand on the thrusters while maintain a retrograde orbit, I finally had the lander down on the ground (and even remembered to extend the landing struts!)
The external tanks were just barely empty (I hadn’t separated them during the descent as I thought perhaps the extra fuel might be nice for the Mun launch. However, upon reaching the surface, they were just barely drained. Easy quiet separation. Now for the EVA. I extended the ladders and Jebediah had himself a short stroll on the Mun before climbing back in for the trip home.
From there, a simple launch to get back into Mun orbit, then an orbital transfer back to Earth, which brought Jebediah down nice and safe and ready for his next mission!
Key Learning — having all that extra fuel was nice, but next time I could do things MUCH more efficiently at the landing stage, allowing me to launch a much lighter landing vehicle. Next challenge – Landing on Minmus and returning safely!