What I Learned at Educator.com Filming AP Physics C in Two Weeks

Image

It’s my last day on the west coast following two weeks of recording at the Educator.com studios in Los Angeles.  I’ve completed filming of the AP Physics C: Mechanics and the AP Physics C: Electricity and Magnetism courses, and roughly 18 months ago finished recording the AP Physics 1 and AP Physics 2 course sequences.  At the conclusion of this massive effort, I thought it fitting to take a few minutes and summarize what I’ve learned from the experience.

First, I’m amazed at the total amount of content involved in these projects when all was said and done.  The AP Physics 1/2 course includes more than 930 slides, and the AP Physics C total is up over 950.  Coupled with diagrams, formulas, and illustrations, these represent roughly a year’s worth of full-time effort, squeezed in to an already busy schedule with early morning work, weekends, and middle-of-the-night can’t sleep sessions.

Second, I’ve recognized how challenging the content truly is for the AP-C course.  I had some of the content prepared already from my APlusPhysics videos, yet it still took me more than 5 months to create the more-detailed Educator.com lessons.  I designed each lesson in detail, and even made notes on what I would discuss, derive, and explain on each individual slide.  When I reached the studios in LA, however, I still had tons of preparation work to do.  Each day I rehearsed every lesson three times before filming.  I’d go over the lessons in detail (including solving all problems and writing out all derivations in my notebook) over an extended dinner each night in the hotel, then go back to my hotel room and do it all again while listening to a baseball game before bed.  Early the following morning, I’d get up around 5 am and go through it once more before our 9- or 10-am filming session would begin.  Once filming for the day was complete, I’d do it all again in preparation for the next set of lessons.  I wonder if I didn’t do more physics homework in my two weeks of filming in LA than my students do in an entire year.

I found as I went through this that every time I solved a free response problem or walked through a derivation, I found slightly different methods of solving the problem.  Some were smoother than others; some were longer than others.  Even though my final passes were usually “cleaner” than my initial solutions, I tried to stick with my initial solutions in the videos to better mirror the approach students might take.

Even with all that preparation, the recording sessions were still quite stressful.  In walking through the lessons, there were technical components to the presentation that were fairly unforgiving.  Hit the wrong button in the wrong order and you’d have to start all over again.  Switch colors and then switch slides before writing and you’d have to do it all over again. Cough, sneeze, or forget where you are in a lecture or stump yourself — you got it, do it all again.  Thankfully, I’d had quite a bit of experience in this sort of thing from my previous trip out to LA to record the AP-1/2 series, so the amount of “re-do” work was kept to a minimum due to all that preparation.  But recording four hours of video lessons sure felt like a 12+ hour day.

In addition, I still found the AP-C material challenging.  In my classroom, I prepare with 42-minute lessons, and the longest I ever lecture in a row is one entire 42-minute period (and I try to avoid that like the plague).  Here, the lessons are straight lecture, with no breaks, no edits, no room for error.  That leaves a lot of material to have down cold while also dealing with technical concerns.  My detailed noted were invaluable, and I referred to them throughout my lectures to make sure I covered all the salient points in each slide, as well as having calculations pre-solved, as opposed to making viewers wait while I punched numbed into my calculator.  With my preparation, my time between lessons was approximately 10 minutes or so to get a quick drink, review the slides for the next lesson for any last-minute issues, and allow the technical folks to prepare the studio for the next round.  Others in the studio, however, would take extended time between recording lessons in order to prepare.  They had the luxury as they were fairly local to the studios, and could spread their recording work out over months.

Working through these courses from start to finish in such a detailed manner in such a compressed time span provides a unique perspective on the course.  Each lesson is designed to present a concept as simply as possible, illustrate that concept, and then demonstrate its application in a variety of scenarios.  In creating these courses I solved every released AP-C free response problem going back to 1998, as well as a scattering of earlier problems.  With the entire breadth of the course fresh in my mind, I’m confident the foundational principles emphasized in the course provide excellent preparation for students taking the AP Physics C exams.  

One of my goals in creating these courses was to provide a more streamlined video series than their previous video series.  Their previous courses totaled 48 hours for mechanics, and 41 hours for electricity and magnetism.  My goal was to cut each of those at least in half, allowing students to minimize their time watching videos, and instead maximize their time actively working with the material.  I haven’t seen the final count for the new courses, but I’m confident we’ll be close, if not under, our target.

Uncle bob has a toupee hg clr st

I’m also excited that the College Board will be allowing students the use of formula sheets and calculators throughout the entire exam next year.  Even after studying and preparing all day every day for weeks, I still referenced my formula sheets and notes in solving problems and preparing.  Memorizing formulas does not constitute learning or understanding, and removing the requirement to have all these formulas memorized will allow students to better focus on what is important.

Finally, I knew being gone from my family for two weeks would be difficult.  I have a two-year-old and a four-year-old daughter at home, and they are already growing up way too fast.  I treasure my time with them, especially our time in the summer when Daddy-Daughter Day Care includes swimming, playing around out back in the sandbox and water table, riding bikes, playground time, and so on.  But it’s been even tougher than I expected.  I’m so thankful for modern technology which allows me to see them and talk to them each day, but when your little girls says all she wants is you to curl up in bed with her after story time at night, it tugs on your heart strings something fierce.

I’m proud of what we’ve put together here at Educator.com through these efforts, and hopeful that students across the world will find these videos helpful in their studies.  I’m also excited to know that I will be able to use these resources with my students in the coming years.  I’m relieved to have finished this project, eager to refocus my efforts on other projects such as revisions to AP Physics 1 Essentials and completing AP Physics 2 Essentials, but most importantly, I can’t wait to get home and hug my girls.
Creating Screencasts – 2013 Update #edtech #flipclass

Hi Folks,

At least once or twice a week I receive an e-mail asking how I make my screencasts, and given these posts are a couple years old, and I’ve adjusted my methodology a bit in the past few years, it seems high time I provided an update on my recommendations for screencasting. So, here goes.

Screen Shot 2013-05-29 at 8.20.40 AM

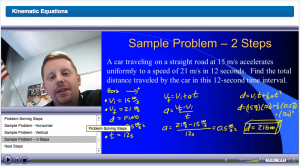
For those using Windows PCs, not much has changed terribly. I still highly recommend Camtasia:Studio as one of the most cost-effective and easy-to-use software packages for screencasting (make sure you choose Education pricing for a 40% discount). It allows you to record what’s occurring on your screen, as well as your face (via webcam), and puts it all together with a variety of output options. It is my go-to tool when using a Windows system. Typically I create my presentation in Powerpoint, then load up Camtasia to record my walk-through of the presentation, and do a majority of post-processing in Camtasia. Finally, I upload to Youtube and also to the APlusPhysics.com site (many schools block Youtube, so having the videos in a separate place helps teachers provide access to all their students, regardless of location or device). A good example of a video created in this manner is the Kinematics Equations Regents Physics Tutorial.

About 18 months ago, however, I switched from the Windows platform to the Mac platform. The “why” of the change is a long story, and probably not of interest to most readers here, but the transition was much smoother than I expected, and although I realize you pay a premium on the hardware end, I’m much happier with the transition than I initially anticipated. Initially I tried quite a few different methods championed by other teachers using Macs, but everything I tried was either flaky, too complex, or required too much “work” during the presentation — and when I’m creating the screencasts, I want to focus as much of my attention as I can on teaching the material as effectively as I can, with as little focus as possible on technical aspects of screencasting. For those who have been making screencasts, you realize how challenging it is to try to take a lesson, concept, or problem-solving approach and condense it down into just what the students need to know to get started. My goal in my videos isn’t to replace the classroom or teacher, but rather take the repetitive basic content and condense it down into something the kids can do at home, leaving us more time in class for hands-on activities, exploration, extension, and challenge work.

Without digressing TOO much further, I soon decided I had to come up with my own method. After a bit of trial and error and the purchase of several software packages that just didn’t work out for me, here’s the method I came up with (and am quite happy with). First, I create my presentation materials in either Powerpoint or Keynote (I prefer Keynote on the Mac to Powerpoint on the Mac just for level of integration, but they’re pretty much equivalent). Once my presentation slides are complete, I export them in PDF form. Then, I import the PDF presentation into a wonderful Mac software package known as Curio (HIGHLY recommended and comes with amazing developer support), “Spread” the PDFs out onto various pages, and I use Curio as my background software when I run my screen capture.

Screen Shot 2013-05-29 at 8.50.34 AM

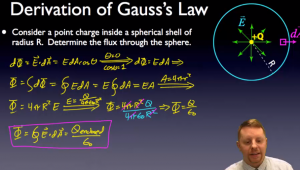
For the actual screen capture work, I went back to Techsmith’s Camtasia:Mac. It doesn’t have quite as many features as the Windows version, and post-processing is considerably less intuitive if you want to zoom, scroll, etc., but for the basics it’s pretty slick, and it also has one more GREAT feature that I love — the ability to remove a color from your recorded webcam video. This means you can do some basic “green screen” or “chromakey” work right in Camtasia:Mac. I’m not thrilled with the level of control of this feature, as there’s definitely some room for improvement, but it’s a great start and its easy integration right into the regular workflow makes it quick and easy to implement. The AP Physics C: Gauss’s Law video demonstrates a screencast created with this workflow. As an added bonus, Camtasia for Mac is also considerably cheaper than the Windows version, currently about $75 for an academic license.

Which leads us into the tricky part, the hardware. The most important part of your setup, from my perspective, is your writing input device. On the Windows side, for years I’ve used a Tablet PC (not an iPad or similar device, but rather a laptop computer that has a screen you can write on). These tend to be rather pricey (prices typically start around $2K for a decent system), and I haven’t had the greatest luck with them as far as reliability goes, despite attempts at buying high-end systems. What I consider a better alternative is the purchase of a separate input device, so that you can always upgrade / swap out the computer itself as needed, but continue using the input device from system to system.

Initially I started working with a Wacom Intuos tablet. It does what it’s supposed to, but I had a heck of a time looking at a separate screen while drawing on a separate input device. My handwriting was awful (even more awful than when I write directly on the screen), and I found myself stressing about the technicalities of the screencast as I worked. It just wasn’t comfortable at all. So, the barely-used system is sitting under my desk waiting for me to either put it up on eBay, loan it to another APlusPhysics contributor, or sell it for pennies on the dollar.

Shortly thereafter, I decided to take the plunge and purchased a Wacom Interactive Pen Display, model DTU-1631. I use this in my classroom each day as well, projecting the DTU-1631 screen on a digital projector, and writing my notes directly on the screen. This has the extra advantage of allowing me to capture all my class notes and publish them directly to our Regents Physics and AP Physics C blogs. It’s not the greatest monitor as far as overall image quality, and it’s certainly priced above where I think it should be (~$1000), but it works, and has become my everyday workhorse in the classroom. I’m pleased to see Wacom is coming out with some considerably upgraded interactive pen displays this summer, which may provide some further options.

I also invested in a system for home use this past fall, saving me the hassle of lugging the DTU-1631 back and forth from school to the home office regularly. Without the need to project the monitor, I decided on the Wacom Cintiq 22HD system. Again, the monitor image characteristics leave a bit to be desired in a high resolution monitor, but the ability to write directly on the screen at high resolution takes all the technical hassle out of creating screencasts. It’s not for the dabbler, however, as discount price is typically right around $2000.

Blue Yeti USB Microphone

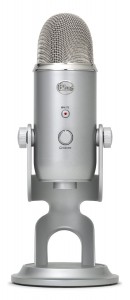
As far as audio and microphones go, I continue to use a Zoom H2 Digital Recorder at home, which does a nice job of capturing audio cleanly at a price point around $180 with a bit of searching, but a year or so ago I purchased a separate Blue Yeti USB Microphone and I absolutely love it. It’s easy to use, has a tremendous cardiod mode, and provides awesome sound in a cheap, reliable manner. At a price point of roughly $100, I don’t think you can beat it, and it wouldn’t take much for me to trade in my more expensive Zoom H2 for a second Blue Yeti for the home office.

As far as webcams to capture the instructor’s face, just about any Logitech-type USB webcam will do. I’ve used a number of different webcams, most recently a Logitech HD Webcam C615 (due to its Mac compatibility). They do a decent job. For the higher-end videos using the chromakey (green screen) technology, I wanted something a little better, and found an outdated Canon ZR850 sitting in our closet. This mini-DV camcorder didn’t see much use in our house due to the advent of all the flip cam technologies, iPhones, etc., but I found that by connecting to my Mac through its firewire connections, I could get high quality, stable images fed directly into the computer and compatible with Camtasia. Certainly not a necessity, but a nice little extra.

Finally, in the interest of full disclosure, I do just a touch of post-processing on my videos outside of Camtasia. Although Camtasia has noise reduction algorithms built in, I had already purchased a license for the full Adobe Creative Suite (Master Edition) to build the APlusPhysics website, so thought I might as well use as many features of the software as I can. I use Adobe Audition to tweak the audio input from my microphones just a touch before final processing. This allows me to easily standardize volume levels, pull out 60Hz hum from the electrical system, and even remove a bit of the HVAC noise from my recordings. Certainly not necessary for a good screencast, but a little extra since I already had the software on my system.

There are certainly cheaper ways to do screen casting, and many great free to nearly-free alternatives. I’ve chosen this route with the goal of spending my time and resources up front to create high quality videos that I can use for years and years, tweaking and re-doing individual videos on a piecemeal basis to continually improve the quality of the video collection, as opposed to redoing the course year after year. There are certainly other strategies and workflows, but I’m hoping this may provide at least a start to others who are interested in screencasting without having to travel down all the mistaken paths I had to in developing this methodology. Make it a great day everyone!

Terrific Regents Physics Resource: 123Physics.com

Yes, it’s been awhile since my last post.  We’ve had some family excitement in the recent past, including two difficult losses, but I’m thrilled to most recently have added a baby girl to our family (I’m heading to the hospital to bring mom and baby home today!)  All are well, and we’re so excited and blesses to have such a wonderful addition.

NewImage

I’ve been long overdue on this post, but wanted to share a great online resource with high school physics teachers.  Anthony Mangiacapre, author of the terrific St. Mary’s Physics Online site, has another winner on his hands.

123Physics is a site that includes more than 1300 multiple choice questions to assist students in preparing for the NY Regents Physics exam (as well as most any algebra-based physics course).  It includes link to the St. Mary’s online physics lessons, Tony’s terrific Youtube video channel, and even a collection of physics clipart.

Most attractive, though, is the set of online review questions.  Tony has set up the site to allow students to take a full Regents exam online (multiple choice questions), with selections from many recent exams (2000s).  Further, you can set up practice quizzes on the following topics:

  • Electricity
  • Energy
  • Mechanics
  • Modern Physics
  • Waves

Upon choosing a main topic, you can select a sub-topic to focus on.  For example, the waves topic is broken up into:

  • EM Waves
  • Index of Refraction
  • Reflection
  • Refraction
  • Sound
  • Wave Characteristics
  • Wave Phenomena

From there, you can choose which type of question to focus on, either general knowledge, reference table, or plug-in types.  This provides students a huge range of quizzes they can create to test their knowledge on any specific topic, or type of problem.  In my experience, students MUCH prefer doing work on the computer compared to hard copy paper — for some reason it just seems to be more fun and/or engaging, and the instant feedback provided allows students to fix their mistakes and work through any issues immediately.

Tony already has a tremendously valuable student resource in his St. Mary’s Physics Online resource, and with the addition and tie-in of 123Physics along with his Youtube videos, Tony has managed to share his terrific resources with not just his students, but with all interested students and educators.

RAPTOR Physics Teacher Meeting Minutes 1/14/12 #physicsed

I had the privilege of attending the Rochester Area Physics Teachers Out-Reach (RAPTOR) meeting at Rochester Institute of Technology on Saturday, Jan. 14, from 9 a.m. to noon.  With more than 20 physics instructors in attendance, I was thrilled to meet many great teachers, reconnect with old friends, and walk away with a bunch of new ideas and resources.

The meeting began with some collegial discussions and socialization, followed by introductions — introductions of both the RAPTOR association itself, and of the individuals in the room. RAPTOR is a group of physics teachers centered in the Rochester area focused on sharing ideas, demonstrations, discussing concerns, issues, and solutions, with the goal of improving physics teaching and learning for all involved.

Brendan Noon has created a WIKI depository for teaching materials at newyorkphysics.wikispaces.com.

Special thanks to the RIT physics department for hosting us on a Saturday morning!

Tom Frys provided information on the annual High School Model Bridge Contests.  These are held each year in conjunction with National Engineers Week, and are quite popular both in Syracuse and Buffalo.  Interest is developing in Rochester to expand the program locally as well.  Examples of bridges were presented, as well as design specifications.  Organizers are very willing to work with the RAPTOR teachers to make the event a success in the area.

Dan Fullerton talked about APlusPhysics.com and the Regents Physics Essentials book.  In addition to highlighting what resources were available, I tried to focus on showing ways in which these resources could be utilized in a classroom to provide differentiated and personalized instruction outside of class, leaving more valuable classroom time for active learning, exploration, and instructor assistance.  I also presented an example of how Regents Physics Essentials and APlusPhysics are used at Irondequoit High School to streamline mid-term and end-of-year review activities.

Brendan Noon then presented on Planning a Differentiated Lesson w/ Game Show Review.  Following the style of Jeopardy, students create their own review game shows.  This can be implemented in a wide variety of ways, but leaves many options available for differentiating by level of Regents questions, assigning higher level questions to higher level students, and also assigning less frequently found topics to higher level students, while maintaining heterogeneous class groupings.  Recommendations included having all students answer all questions (check by whiteboard presentations).  It was also noted that TestWizard contains quiz functionality (even if many of the solutions are incorrect and need to be checked in advance.)  Following the meeting, I noted in a recent catalog from the AcademicSuperstore that Jeopardy-style classroom equipment is still being sold.

Next up was a discussion of the Common Core Standards and Assessments, and the wide range of ways they are being presented and implemented in physics classrooms.  Brendan Noon began the discussion by highlighting data showing statewide graduation rates are up, though college readiness has not increased.

This has led to xix shifts in ELA/Literacy and six shifts in mathematics.  Highlighting key shifts, ELA shift 1 deals with applying strategies to reading information text, teaching strategies for informational texts, and scaffolding for difficulties.  Noon shared a Buffalo State “Reading Log” format for physics, which covers the NY State / Common Core standards.  Students diagnose their own vocabulary, interpretations, question themselves, re-read, graph/diagram, etc.  These are typically assigned as homework, and at Buff State, are graded on a five point scale, with five points for completing them correctly the only rubric required.

There is a big focus on getting students to use textbooks at some level.  Schools have been given money specifically targeted for textbooks (and only textbooks).  Schools can also document the use of this money as part of their School Improvement Plan reports.

Questions were raised about what grade level texts must be specified as.  Noon noted that any textbook which is specified by the author/publisher as targeted at a specific grade level, is by design appropriate for that grade level (at least as far as the “legalese” of the current common core documentation is concerned.)

ELA Shift 2 deals with handling primary source documents with confidence.  Many see the text itself as a source of evidence, but it’s also possible to use a wide variety of sources such as websites, fiction and non-fiction books, and even popular magazines as sources.  Further, it’s quite possible to use different interpretation levels within the same texts as well as different texts with different interpretation levels to differentiate student expectations.  The ultimate goal is to stop referring to and summarizing texts, and teachign students to start reading and understanding as we build a community of independent learners.

All teachers are required to create two units of common core materials this year, although there is no statewide system of verifying this is completed.  This is being met in a wide variety of ways from a wide variety of instructors with a wide variety of success:

  • “Read book, answer questions”
  • “Read article, generate an argument”
  • “Some districts not doing anything”

Text can be words, data, or arguments.  A great source for these types of questions is ACT review books with science passages — it’s easy to add one of these to the end of a test for practice and help students build these skills throughout the year.

Next was a sharing/discussion session to close out the meeting. One member demonstrates applications and demonstrations of falling discs and gyroscopes, another showed a quick demonstration to build thinking about conservation of energy and magnetism, yet another discussed challenges and experiences teaching in an urban environment.

Members discussed how RAPTOR should be a terrific resource for new teachers as well as more experienced instructors.

Steve Whitman talked about the use of Interactive Physics as a classroom resource, providing several demonstrations and discussing potential for further development of teacher training and supporting resources through a grant with SUNY Brockport.

Meeting closed with distribution of a number of terrific door prizes!


For more information, check out the RAPTOR Facebook Page at http://www.facebook.com/pages/Rochester-Area-Physics-Teachers-Out-Reach-RAPTOR/261529007244589